
Learning Management System (LMS) Evaluation - Week #1

LMS Evaluation Introduction
Welcome to the Week #1 Learning Management System Evaluation page. Learning Management Systems are software applications for the administration, documentation, reporting, tracking, and delivery of training programs and educational courses. Each weekly page provides step-by-step instructions required to perform various LMS tasks and evaluations of functionality and quality for two Learning Management Systems: LMS #1 - Desire to Learn (D2L), and LMS #2 – Canvas.
Week #1 LMS Features and Capabilities Evaluation
The following features of D2L and Canvas are evaluated for week #1:
- Setting-Up a New Course Shell
- Adding Modules and Content
- Adding Third Party Content
- Creating Content Using an HTML Editor
- Adding Images to HTML Editor Pages

LMS #1 Evaluation: D2L
1. SETTING UP A NEW COURSE SHELL
Setting up a shell is the first step in creating a course in an LMS. To set up a new course shell, perform the following steps:
A. Once the D2L account is created, select Course Admin located in the top tool ribbon to create a homepage.
B. In Course Admin, select Homepages under Site Setup at the top of the page.
C. Choose a format and theme for the homepage. You can customize the homepage by adding system or custom widgets, or applications that provide up-front access to various tools, applications, or websites.
D. Next, add existing Wright State students. Select Classlist located on the top tool ribbon, then select Add Participants/Add Existing Users. Next, select a role (student, faculty, etc.), then perform a search using their first and/or last name and Org Defined ID. Once found, select Enroll Selected Users (image).
E. The last step is to activate the class. To do this, select Course Admin in the top tool ribbon. Then, select Course Offering Information under Site Setup. On this page, select the box that says Course is Active, then select a start and end date on the same page.
View the YouTube video below to see step-by-step instruction on how to set up the D2L shell.
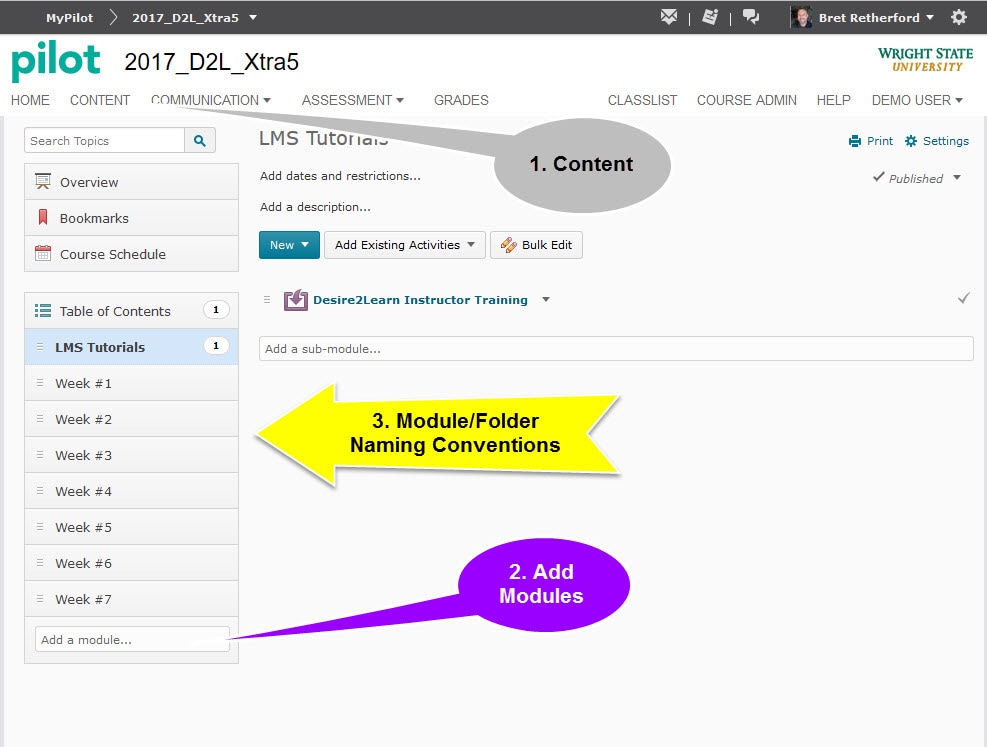
2. ADDING MODULES AND CONTENT
Modules provide systematic folder organization to the LMS. To add Modules and Content for each week of the course, perform the following steps:
A. Select Content on the top tool ribbon.
B. Navigate to the fillable field that says Add a Module, then input a module name. A module is as a folder that contains each week’s activities, information, images, videos, etc.
C. Name each module for a corresponding week of the course. For example, type in “Week 1” for the first week’s module, then select “enter”.
D. Create as many modules and associated naming conventions as there are weeks for the course. You can also create modules for other course information, such as tutorials.
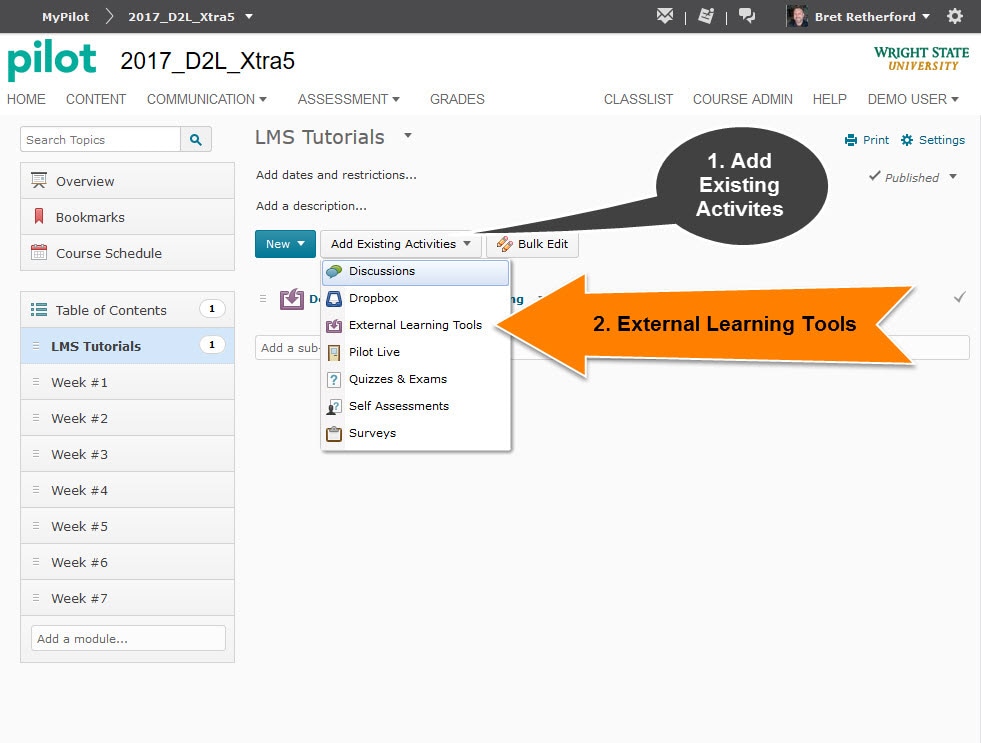
3. ADDING THIRD PARTY CONTENT
Third Party Content allows an instructor to add external information such as tutorials, videos, and other supporting information to a module.For this example, video tutorials by Atomic Learning that demonstrate how to use various types of LMS applications are used. To add Third Party Content, perform the following steps:
A. Select Content in the top tool ribbon
Create a module titled “LMS Tutorials”. Once created, select this module.
B. To add Third Party Content, select Add Existing Activities, then select External Learning Tools.
C. Select Atomic Learning. Once selected, click on the link and enter keywords to browse available courses. You can add as many tutorials as you wish. For this exercise, add tutorials that support the D2L LMS. You can use these tutorials as reference in subsequent LMS activities. Once you have the tutorials you want, select Preview Selections, then select Submit.
D. Once you have the desired tutorials, customize the name of the link from “Atomic Learning” to a name that is associated with the actual tutorials. There are various ways to edit the title. One method is to select the Atomic Learning link. This will take you to the actual tutorials.
E. On this page, select the drop-down arrow next to the content title, then select Edit Title. Choose a name that corresponds with the content.
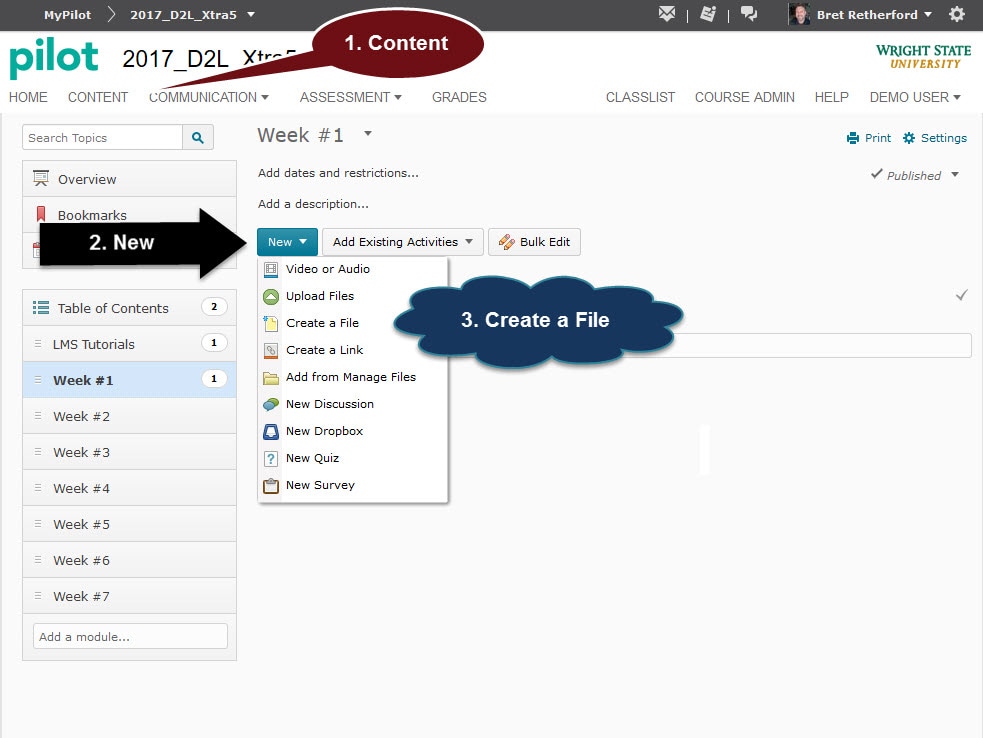
4. CREATING CONTENT USING AN HTML EDITOR
Content such as text, images, videos, and URL links can be added to a module using a the D2L built-in HTML editor. Perform the following steps to add content:
A. Select Content in the top tool ribbon.
B. Select a module to add content. For this example, Week #1 is selected.
C. Once in the Week #1 module, select New, then select Create a File to access the HTML editor.
D. To insert text, create using a word document (recommended) to allow spell and grammar checking prior to pasting the text in the file.
E. Paste text in the body (large rectangular box) of the file. Add videos, images, or links as needed.
F. Perform a final spell check of the text, then select Publish.

5. ADDING IMAGES TO HTML EDITOR PAGES
Adding an image to the HTML Editor Page you just created is as straightforward as adding text:
A. Select the module containing the HTML Editor Page. Select the HTML page you created, then select EDIT HTML on the bottom left of the page.
B. In edit mode, select the Insert Image icon on the top HTML tool ribbon, which is the second icon from the left in the ribbon.
C. To add an image file, drag an image to the upload field, or select the Upload button located within the drag and drop field.
D. Select Add at the bottom of the Add a File box to upload the photo.

Canvas LMS #2 Evaluation
The second LMS software application chosen for evaluation is “Canvas” by Instructure. Canvas offers features similar to D2L. For comparison, the same five functions reviewed for D2L are also reviewed for Canvas to evaluate overall quality, intuitiveness, and ease of use.
1. SETTING UP A NEW COURSE SHELL
A. After creating a Canvas account with Instructure, you are presented with a page that offers a tool ribbon on the left. To start the course shell, navigate to Dashboard on the left tool bar, then select Start a New Course. Once selected, this creates a shell that provides various options up front to add students, create modules, add content, and other features.
B. After creating the shell, add students. Within the shell, select People on the left menu, then select the +People blue button on the right of the screen. This brings up the Add People menu. In this menu, you can add users by Email address, Login ID, or SIS ID. Enter the email address(s), select a role and section for the identified users, then select Next when finished.
C. If the user is new, a pop up box will appear indicating a match was unable to be found with the option to create a new user. Select the user’s email address, add a name, then select Next.
D. Another message will appear indicating the user is ready to be added to the course. Select the Add User button on the bottom right of the message to complete the process.
E. The newly selected user will now appear in the class list.
F. Select Publish under Course Status to publish the course.
View the YouTube video below to see step-by-step instruction on how to set up the D2L shell.
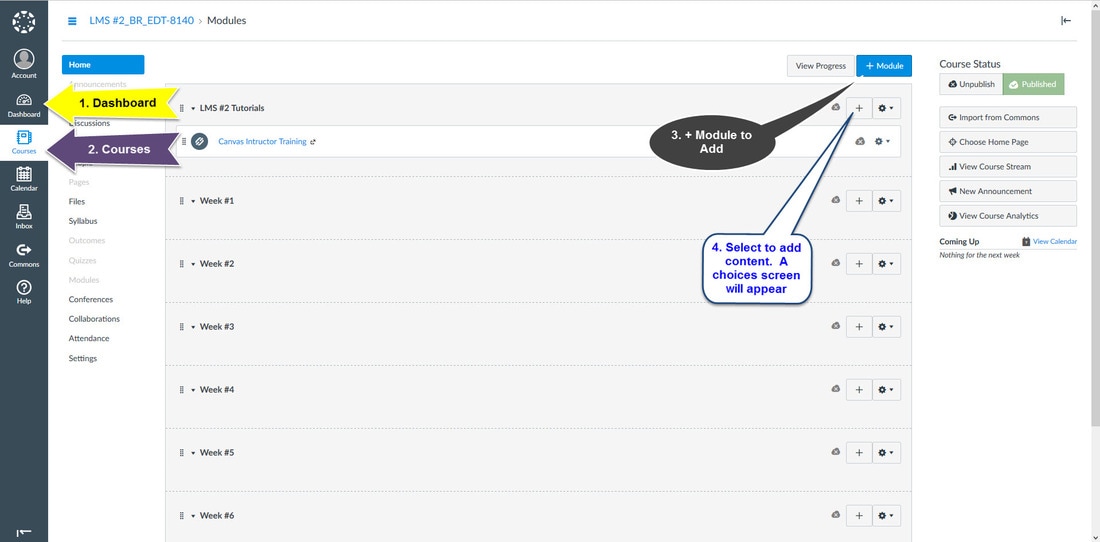
2. ADDING MODULES AND CONTENT
A.To add modules (aka Folders), select Dashboard in the left tool ribbon, then select Courses. Begin creating modules by selecting the +Modules blue button on the top right of the screen. Create a naming convention for each module (i.e., Week #1, Week #2, etc.). Modules for various content other than weekly content can also be added.
B. Once a Module is created, add content by selecting the “+” button on the right of the of the module box.
C. A box titled “Add Item” (module name) will appear. At the top of the box, select the dropdown next to the word “add” to view the content choices. Built-in choices include: Assignment, Quiz, File, etc. When finished, select the Add Item button at the bottom right of the Add Items box.
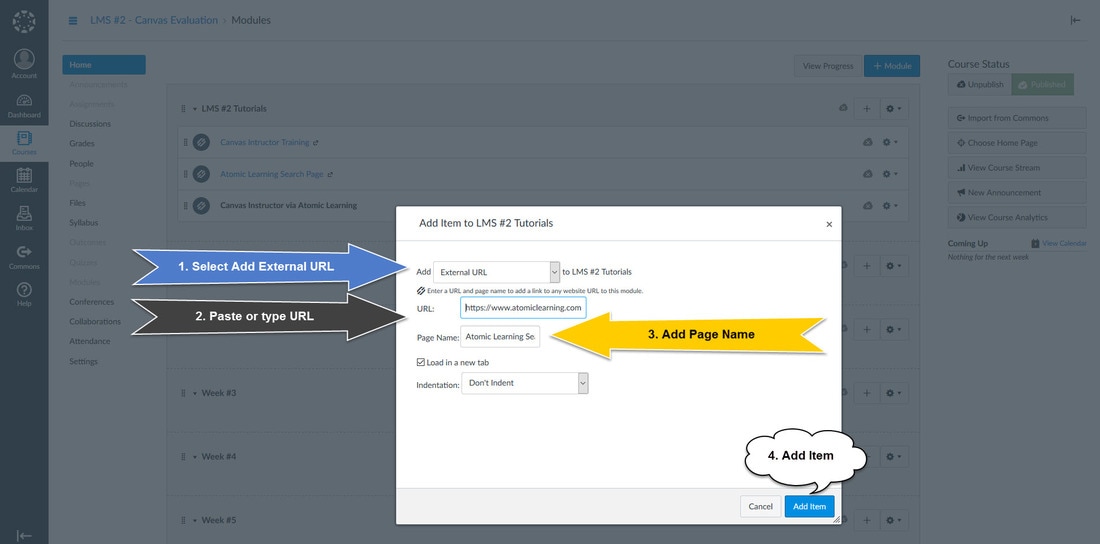
3. ADDING THIRD PARTY CONTENT
A. Third Party Content is added to a Canvas module in the same manner as other content. To add third party content, follow instructions B and C above, and select External URL. Third party content, such as Atomic Learning can be added by copying the URL from the WSU D2L LMS. You can also modify the page name, and load the third-party content in a new tab if desired.
A. Third Party Content is added to a Canvas module in the same manner as other content. To add third party content, follow instructions B and C above, and select External URL. Third party content, such as Atomic Learning can be added by copying the URL from the WSU D2L LMS. You can also modify the page name, and load the third-party content in a new tab if desired.
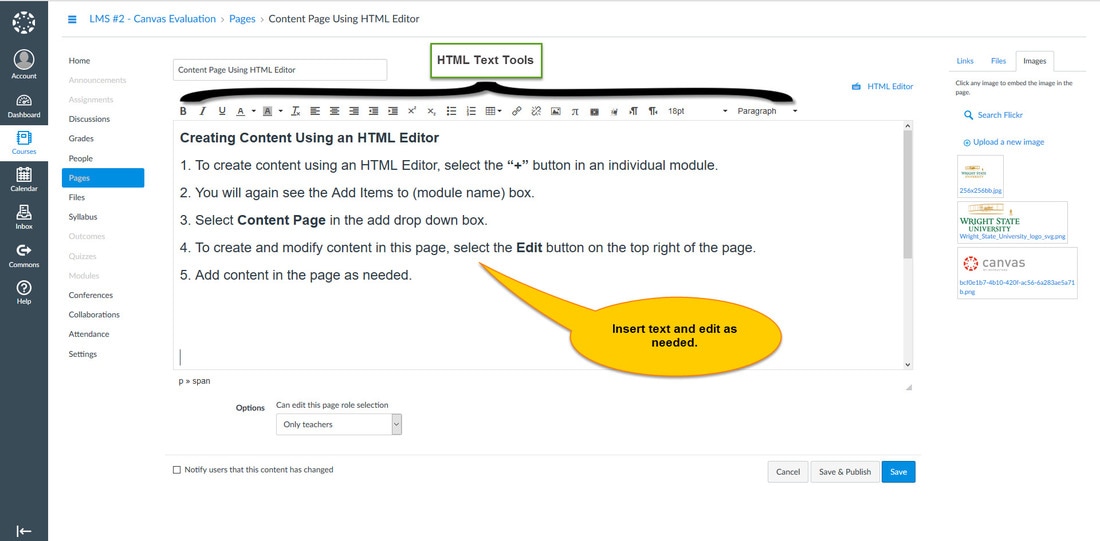
4. CREATING CONTENT USING AN HTML EDITOR
A. To create content using an HTML Editor, select the “+” button in an individual module.
B. You will again see the Add Items to (module name) box. Select Content Page in the add dropdown box.
C. To create and modify content in this page, select the Edit button on the top right of the page.
D. Add content in the page as needed.

5. ADDING IMAGES TO HTML EDITOR PAGES
A. Uploading images to HTML pages is accomplished by using a tool ribbon on the top right of the page within the editor itself. This ribbon allows the option to import links, files, or images. Select images and upload from a computer, website, or an image hosting service such as Flickr.
A. Uploading images to HTML pages is accomplished by using a tool ribbon on the top right of the page within the editor itself. This ribbon allows the option to import links, files, or images. Select images and upload from a computer, website, or an image hosting service such as Flickr.
LMS Weekly Recommendation
With features and function of both LMS applications being equal, the Canvas layout and design seems more modern and visually appealing than D2L, as if derived from a Google type design or format. Additionally, the ability to select options, add content, and navigate was more intuitive. D2L has the feel of an older software application. I found myself referring to tutorials with D2L. With Canvas, I was able to create content and navigate without referencing tutorials.
Week 1 Recommendation:
Week 1 Recommendation:
