
Learning Management System (LMS) Evaluation - Week #2

LMS Evaluation Introduction
Welcome to the Learning Management System (LMS) Weebly Web Page Week #2 Evaluation. Learning Management Systems are software applications for the administration, documentation, reporting, tracking, and delivery of training programs and educational courses. Each weekly page provides step-by-step instructions required to perform various LMS tasks and evaluations of functionality and quality for two Learning Management Systems: LMS #1 - Brightspace (formally Desire to Learn, or D2L), and LMS #2 – Canvas.
Week #2 LMS Features and Capabilities Evaluation
Week 2’s evaluation reviews methods of each LMS that facilitates Interaction with the student. The five interactive features of each LMS reviewed this week are:
1. Electronic Grade Book Category/Items
2. Creating Groups
3. Creating Group Discussion Topics
4. Creating a Collaborative Web Conference
5. Quality Check as Demo Student

LMS #1 Evaluation: Brightspace (D2L)
1. ELECTRONIC GRADE BOOK CATEGORY/ITEMS
Creating a grade book in Brightspace requires a number steps in three separate tabs.To create a grade book with a number of useful options, perform the following:
Next, add structure to the grade book. This step provides organization by grouping grades into categories (or folders), and naming each individual grade (or item) by giving it a unique but consistent naming convention.
To add structure to the grade book, perform the following steps:
View the YouTube video for detailed information about how to create assignments and manage grades.
1. ELECTRONIC GRADE BOOK CATEGORY/ITEMS
Creating a grade book in Brightspace requires a number steps in three separate tabs.To create a grade book with a number of useful options, perform the following:
- Select Grades in the top options ribbon.
- Select Settings on the top right under (in blue) to the left of Help under the top options ribbon.
- You should now see Personal Display Options containing one of three tabs.
- TAB 1: In the Personal Display Options tab, check all three choices under Grade Details. Change Start Page to Manage Grades, and select Save.
- TAB 2: Select Org Unit Display Options. In this tab, select all three choices under Student View Display Options – Grade Details. Select Save.
- TAB 3: In the Calculation Options tab under Grading System, select Points. For Final Grade Released, select Calculated Final Grade. Under Grade Calculations, select Drop Ungraded Items. Next, select Automatically Keep Final Grades Updated under Auto Update. Select Save. You will see a message asking if you want to save all changes – select Yes.
- Return to Grades by selecting Grades in the top option ribbon.
Next, add structure to the grade book. This step provides organization by grouping grades into categories (or folders), and naming each individual grade (or item) by giving it a unique but consistent naming convention.
To add structure to the grade book, perform the following steps:
- Select Grades in the top tool ribbon.
- Add Category Folders to separate grades for ease of location. Crate these folders by academic term calendar weeks to group activity in one location for a specific week in the course. Create seven folders to represent seven weeks in a condensed semester (i.e., WEEK 1, WEEK 2, etc.). To add category folders, select Manage Grades.
- In Manage Grades, select the New button (blue), and then select Category. In New Category – Properties, type “WEEK 1” in the Name field. Select Save and Close.
- To add graded items within each weekly folder, select the dropdown arrow on the New tab, and select Item.
- In New Grade Item, select Numeric under Choose a Grade Item Type.
- Name the graded item (i.e. WK1 Discussion, WK1 Quiz, etc.). Ensure the naming convention of the graded item corresponds with the week in which it will reside and be graded by selecting the corresponding Category (e.g., WK1 Quiz would reside under WEEK 1 category).
- Assign the number of maximum points for the graded item.
- Select Save and Close.
View the YouTube video for detailed information about how to create assignments and manage grades.

2. CREATING GROUPS
Creating groups in an LMS allows students to break away from the larger class to form small collaborative units. Working in groups sharpen cognitive skills, facilitates discussion, and form a sense of community.Complete the following steps to create groups in Brightspace:
- In the top tool ribbon, select the down arrow next to Communication, and select Groups.
- In Manage Groups, select New Category Folder.
- Enter a category name.
- Select Enrollment Type from the drop-down. Select # of Groups, then select Enroll Users and select the names of the students you want to be in a specific group. Select Save.
- Students can now communicate with each other via email.
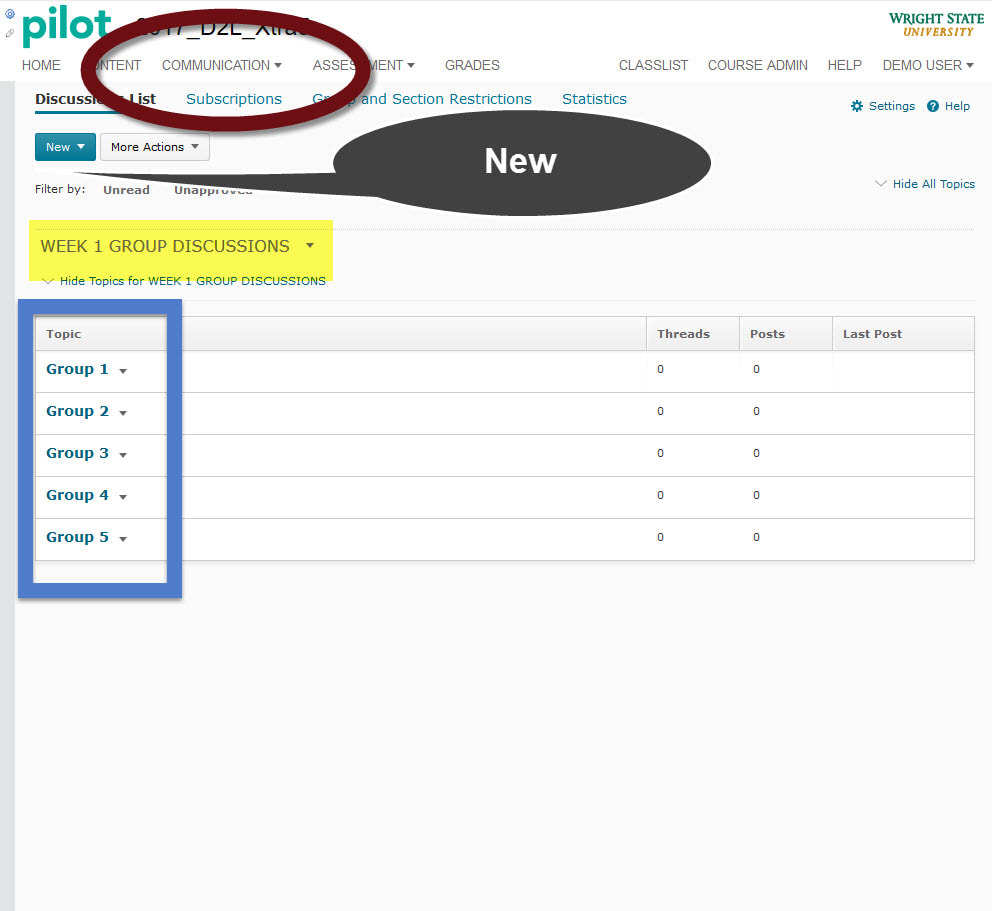
3. CREATING GROUP DISCUSSION TOPICS
Group Discussion Topics allow students to focus on specific topics within a group.To create topics, perform the following steps:
Group Discussion Topics allow students to focus on specific topics within a group.To create topics, perform the following steps:
- Select Discussions under Communication using the down arrow.
- Select New, select New Forum, then name the discussion topic (e.g., WEEK 1 GROUP DISCUSSIONS).
- Select Save and Add Topic.
- Under Discussions, select the drop-down arrow, then select New Topic.
- Create a discussion topic for each group (Group 1-5).
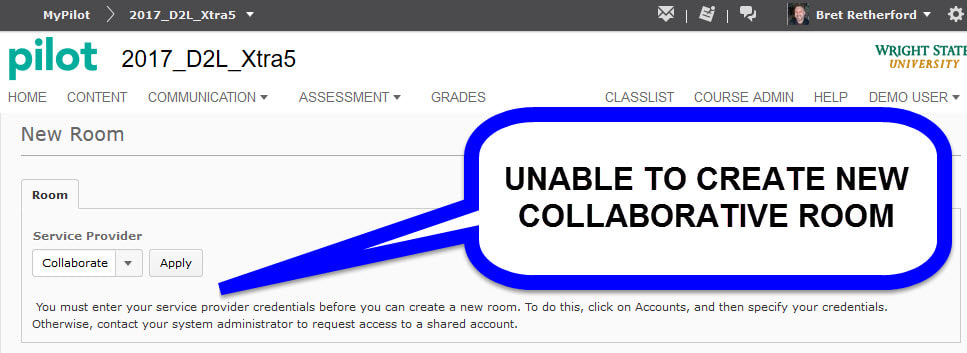
4. CREATING A COLLABORATIVE WEB CONFERENCE
Instructions for creating a collaborative web conference in Brightspace is relatively straightforward, provided you have access. To create a conference, perform the following steps:
Instructions for creating a collaborative web conference in Brightspace is relatively straightforward, provided you have access. To create a conference, perform the following steps:
- In Pilot, select Communication in the top tool ribbon, then select Pilot Live.
- Select New Room. Give the room a name.
- Change visibility to Public Room.
- Set the beginning and end dates for the web conference.
- Select all options in Advanced Properties except “Attendees Join as Moderators”.
- Click Save.
- Test the room as instructor and demo student to ensure it works.

5. QUALITY CHECK AS A DEMO STUDENT
Checking your work as a demo student is highly advisable for any LMS to see what the students in your course sees.To perform a quality check as a demo student in Brightspace, do the following:
Checking your work as a demo student is highly advisable for any LMS to see what the students in your course sees.To perform a quality check as a demo student in Brightspace, do the following:
- Select Demo User in the top tool ribbon of the course home page.
- Select Create Demo Account.
- This will take you to Classlist. Confirm creation of demo user by looking for “ZZ_Student” in the list.
- To log in as demo student, click on Classlist, find the demo student, select the down arrow by the student and select Impersonate – Yes. To test, select the down arrow next to Communications on the top tool ribbon and select Discussions. Post a discussion for Topic 1, Week 1.
- Go back to being a faculty member by selecting the X to the right of Demo Student.
- To review the discussion posting as an instructor, select Home on the top tool ribbon, then view the Updates widget on the right of the home screen. From you can see the new demo student post.
- To post a grade for the discussion post, select Grades on the top tool ribbon, select the down arrow on the right of the Week 1 discussion, and enter a grade.

Canvas LMS #2 Evaluation
1. ELECTRONIC GRADE BOOK CATEGORY/ITEMS
To begin adding gradable content to the weekly modules, perform the following steps:
View the YouTube video for detailed information about how to create assignments and manage grades:
1. ELECTRONIC GRADE BOOK CATEGORY/ITEMS
To begin adding gradable content to the weekly modules, perform the following steps:
- In the Canvas Dashboard, select the course you want to add graded content.
- Select the + button next to the week you want to add content.
- In the “Add Item to Week X”, select the Add dropdown and choose from Assignment, Quiz, or Discussion. For example, when Discussion is selected, Canvas prompts you to associate it with a previous discussion, or add a new topic. Select New Topic, and add a topic name. For this example, name the topic “WK3 Discussion” in the topic name field of the pop-up box. Intent the discussion if needed, then select Add Item at the bottom right of the pop-up box.
- Once the gradable item is created, select Save to save it to its assigned module or folder.
- To see a list view of course students and gradable assignments, select Grades in the left tool ribbon. From the Grades view, there are host of options for an instructor including general or detailed grading, using the speed grader to review a student’s assignment, grade it and leave comments, as well as edit the assignment itself.
View the YouTube video for detailed information about how to create assignments and manage grades:

2. CREATING GROUPS
To create groups in Canvas using the same structure as Brightspace, perform the following steps:
- Within the course, select People on the left tool ribbon. On the top of this page, there are two tabs: Everyone and Weekly Discussion Groups. Select Weekly Discussion Groups.
- On the top right of Weekly Discussion Groups, select +Group Set. In the pop-up, create the Group Set Name and Group Structure. Like Brightspace, split students into 5 groups in Group Structure. When finished, select Save.
- To add students to a group, choose students under the Unassigned Students section of the Weekly Discussion Groups page. You can manually drag and drop the student name to the desired group.

3. CREATING GROUP DISCUSSION TOPICS
Creating Group Discussion Topics in Canvas requires a few additional steps in Canvas than Brightspace. To create topics, complete the following steps:
Creating Group Discussion Topics in Canvas requires a few additional steps in Canvas than Brightspace. To create topics, complete the following steps:
- Select People on the left tool ribbon, then select Weekly Discussion Groups at the top of the page.
- Select a Weekly Discussion Group (Week 1) by clicking on the gear dropdown on the right of the group listing. This takes you to the weekly discussion page.
- On the left, there is another tool ribbon. Select Discussions.
- Under Discussions, select +Discussion.
- Create as many discussion groups as required.

4. CREATING A COLLABORATIVE WEB CONFERENCE
Creating a web conference in Canvas is equally straightforward as Brightspace.Canvas uses BigBlueButton as its built-in conference hosting service.To create a web conference, do the following:
Creating a web conference in Canvas is equally straightforward as Brightspace.Canvas uses BigBlueButton as its built-in conference hosting service.To create a web conference, do the following:
- Select Conferences on the left tool ribbon.
- Select +Conference button on the top right of the screen.
- In the pop-up window, name the conference.
- Set the time duration, options for recording, and conference description. Under Members, select “Invite All Course Members”.
- Select Update.
- This takes you back to the conference screen. You can either join or end the conference as needed.

5. QUALITY CHECK AS A DEMO STUDENT
Canvas refers to Demo Student as a Test Student.To create a Test Student, perform the following steps:
Canvas refers to Demo Student as a Test Student.To create a Test Student, perform the following steps:
- Select Settings in the left tool ribbon. Then, select Student View.
- As a Test Student, you can view course content. However, a Test Student in Canvas does not create a student that appears on the People (real student) page. Therefore, the Test Student cannot participate in Discussions because Discussions require an invitation.
LMS Weekly Recommendation
This week’s review brought out pros and cons of both LMS applications. While Canvas usually has an intuitive interface, it proved to involve more steps in the straightforward applications like creating group topics within weekly discussions. Additionally, the inability to create an enduring demo student that appears in the class list is a significant limiting factor. Brightspace, the older of the two LMS applications proved easier to use with increased capability this week.
Week 2 Recommendation:
