
Learning Management System (LMS) Evaluation - Week #5

LMS Evaluation - Week #5 Introduction
Welcome to the Week #5 Weebly Web Page review of Learning Management Systems (LMS): LMS #1 - Brightspace and LMS #2 - Canvas. Learning Management Systems are software applications for the administration, documentation, reporting, tracking, and delivery of training programs and educational courses.
Each week’s evaluation provides narrative of function and analysis for five capabilities within each LMS. The final weekly analysis concludes with a recommendation of the LMS that out-performs the other in areas including but not limited to: Steps to execute a task, intuitiveness, effectiveness, aesthetics/appeal, and user experience.
Week #5 LMS Features and Capabilities Evaluation: First Impressions - The LMS Home Page
Week 5’s evaluation reviews tools and methods to customize the LMS Home Page. The design, look, and feel of the home page is important because this is the first impression a student has of the course. If the home page is not user friendly, the student may be left with an impression that the LMS course contents are also difficult to access. The five home page features reviewed this week are:
1. Creating a New Customized Course Homepage
2. Creating a “Start Here” Folder and Link to News Widget
3. Adding a “Start Here” Link to Information in the News Widget
4. Customizing the NAVBAR
5. Posting an Audio Message in the News Tool
1. Creating a New Customized Course Homepage
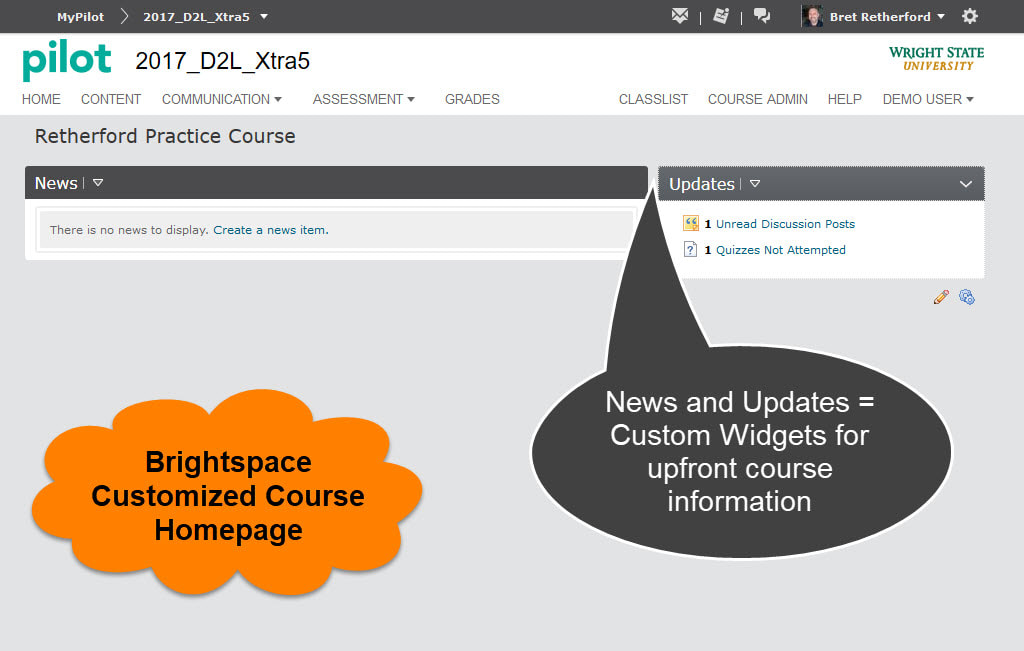
Brightspace LMS shells contain an automatically populated course homepage. To customize this page, select Course Admin, then Homepages under Site Setup. Next, copy the generic course homepage for personal modification. Select the drop-down arrow on the right of Course Homepage, and select Copy. Select Include Homepage Header, and give it a custom name (e.g., LastName Practice Course). Keep it a widget-based homepage. For the header, give it a custom name (e.g., LastName Practice Course). Under layout, ensure basic is selected.
Now add Widgets. Select News and Updates. Delete the Calendar widget if visible. Select Save and Close. Under Active Homepage on the Homepages screen, select the drop-down, then select your custom named homepage, then Apply. To verify the custom homepage is active, select Home in the main tool ribbon. You should now see your custom homepage.
View the YouTube video below for a demonstration on how to create a new customized homepage in Brightspace:

2. Creating a "Start Here" Folder and Getting Started HTML Page
To get students on the right track up front, create a Start Here folder module and Getting Started HTML page.To create the folder, select Content on the top tool ribbon, then select Add a Module.Name the new module “START HERE”. Drag the newly created module to the top of the top under Table of Contents.
To add a getting started HTML page, select the START HERE module on the left in the table of contents.Next, select the drop-down next to the New button, and select Create a File.Title the new document “Getting Started”. Add various information on this page including instructions on how to get started, introduction to the course, etc. Reference the image to view a complete list of recommended page content.
3. Adding a "Start Here" Link to Information in the News Widget
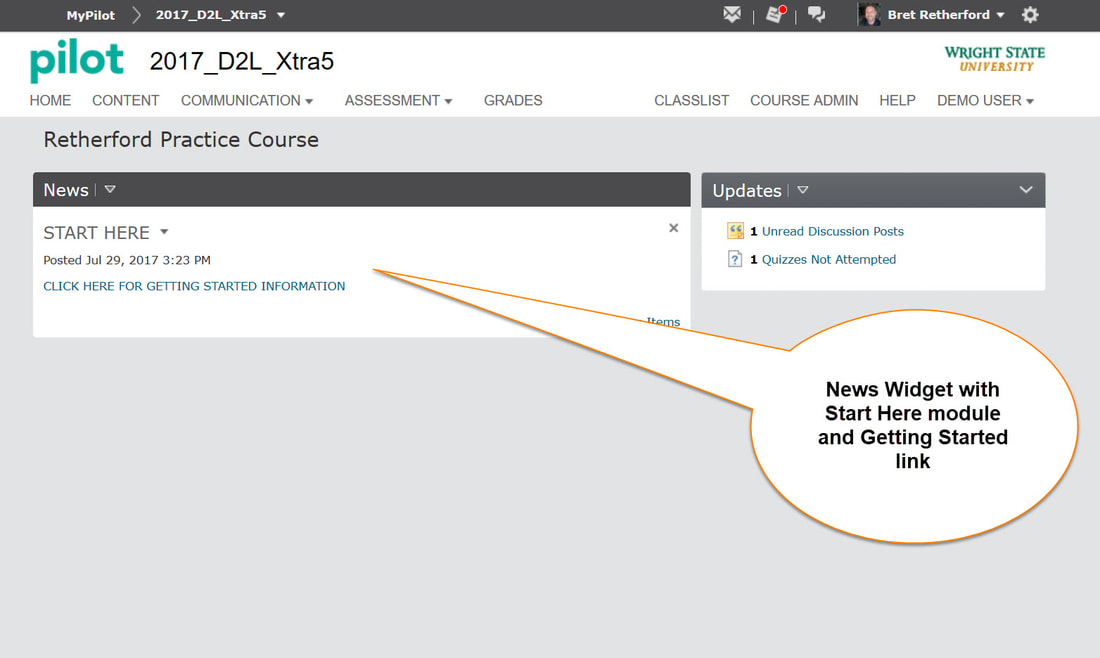
Creating a “Start Here” link in the news widget directs the student’s attention and links them to the getting started instructions up front.
To add this link in the news widget in Brightspace, select the drop down next to the News widget, then select New News Item. Name the headline “START HERE”, and type “Click Here for Getting Started Information” in the HTML section of the page. Select/highlight the text you just typed, and select the Insert Quicklink button on the HTML tool ribbon. Select Content, Start Here, Getting Started. The text will turn blue which indicates it’s now likened to the Getting Started content page. Select Publish to save. You should now see “Start Here” and the getting started information as a news item
4. Customizing the NAVBAR (Navigational Tool Ribbon)
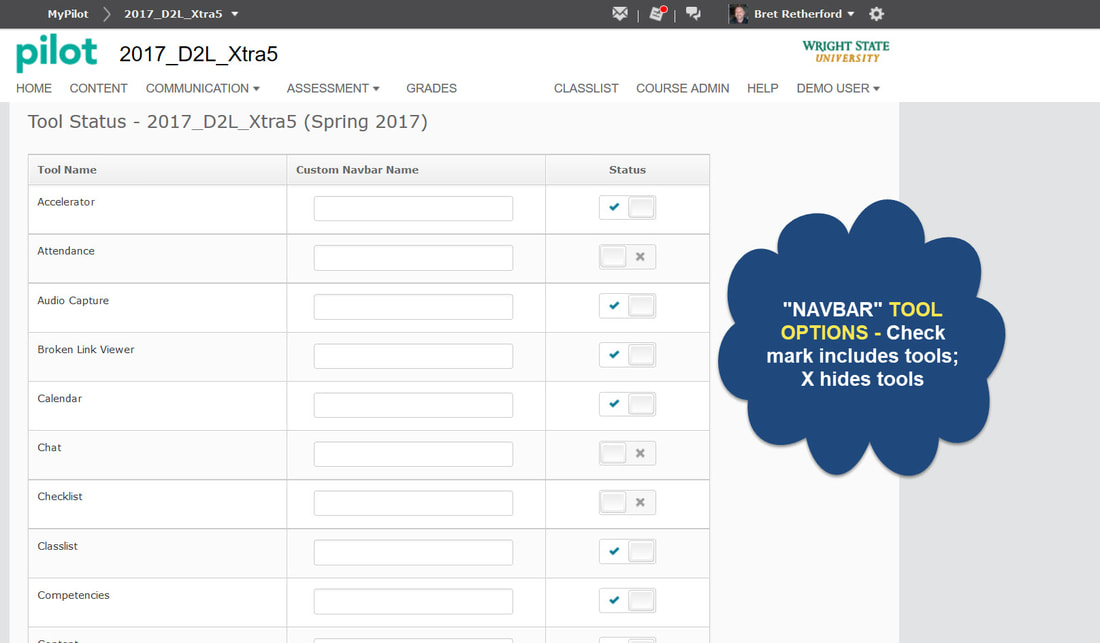
To reduce cognitive overload by offering too many page options, customize the NAVBAR. To select or deselect NAVBAR options, select Course Admin, then select Tools at the bottom of the page under Administration. Select or deselect the tool status by clicking on the check box/X option at the right of the page in the Status column.
For this analysis, deselect Seating Chart and Self-Assessment. Make sure they both show an X instead of a check. Double check to ensure they are no longer available by selecting the drop-down arrow next to Assessment on the Home Page.

5. Posting an Audio Message in the News Tool
To add an audio message that personally connect with course participants, add an audio welcome to the News Tool. To add the audio, select the News Tool dropdown, then select New News Item. Give the recording a title under Headline and add introductory text in the Content section of the HTML page.
Next, select Record Audio under Attachments. Ensure all of the Adobe Flash settings are enabled and correct. Record the audio, and preview the recording as needed. Next, select Publish to publish the audio recording. Go back to the Home screen, log in as a virtual student, and quality check the recording to verify functionality.
1. Creating a New Customized Course Homepage
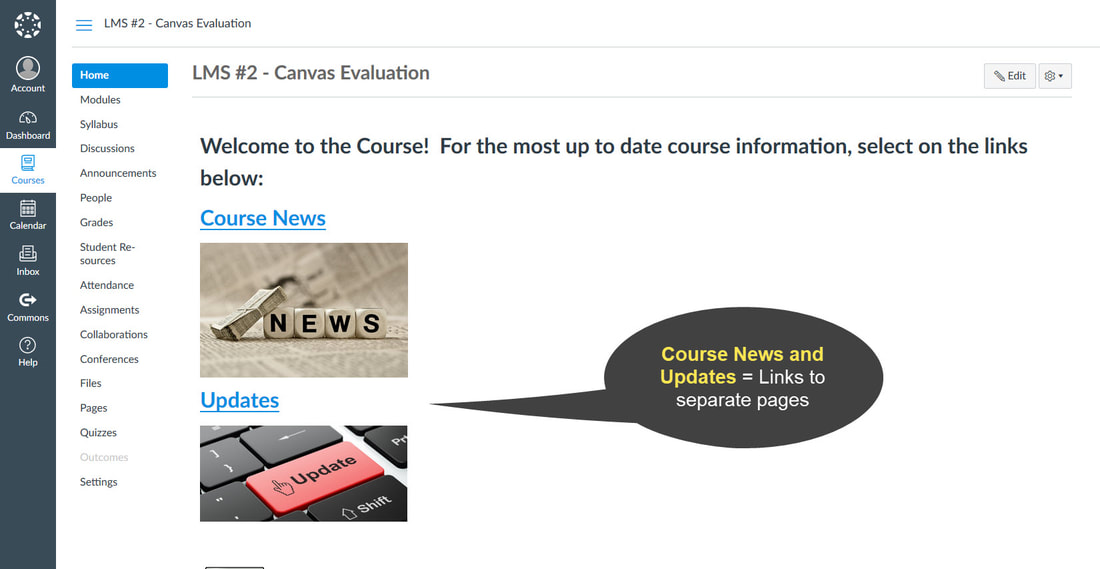
Canvas does not offer a widget feature for homepage customization on the desktop version. This feature is only offered in the mobile version. However, you can still easily customize the homepage by inserting page links to relevant content.
Links are added by selecting Pages in the left tool ribbon. This brings up a list of available course pages. A Front Page is already created in canvas. Select Front Page, and then select Edit. This brings up the Front Page in HTML editor. To add links to custom pages relevant to the Front Page, create a new page (e.g., News, Updates) and insert into the HTML page. You can add supporting images, change the font size/color of the page links, etc. for further customization. Select Save and Publish as needed.
View the YouTube video below for a demonstration on how to create a new customized homepage in Canvas:

2. Creating a "Start Here" Folder and Getting Started HTML Page
Creating a START HERE module and adding a Getting Started HTML is performed the same way previous modules and pages are created in Canvas.
Select Modules in the left tool ribbon, then select +Module. Name the module “Start Here” and move it to the top of the module list. Next, select the “+” button to the right of the module. In the “Add Item to Start Here” pop-up, select Add “Content Page”. Name it “Getting Started Page”, then select the blue “Add Item” button on the bottom right of the pop-up. You will now see the Getting Started Page in the module. Select the page, then select Edit to add content to the page. Add various information on this page including instructions on how to get started, introduction to the course, etc. Select Save on the bottom right of the edit page to save the content. Canvas also allows standalone text headers modules that allow instructors to provide additional instructions within the module itself.
3. Adding a "Start Here" Link to Information in the News Widget
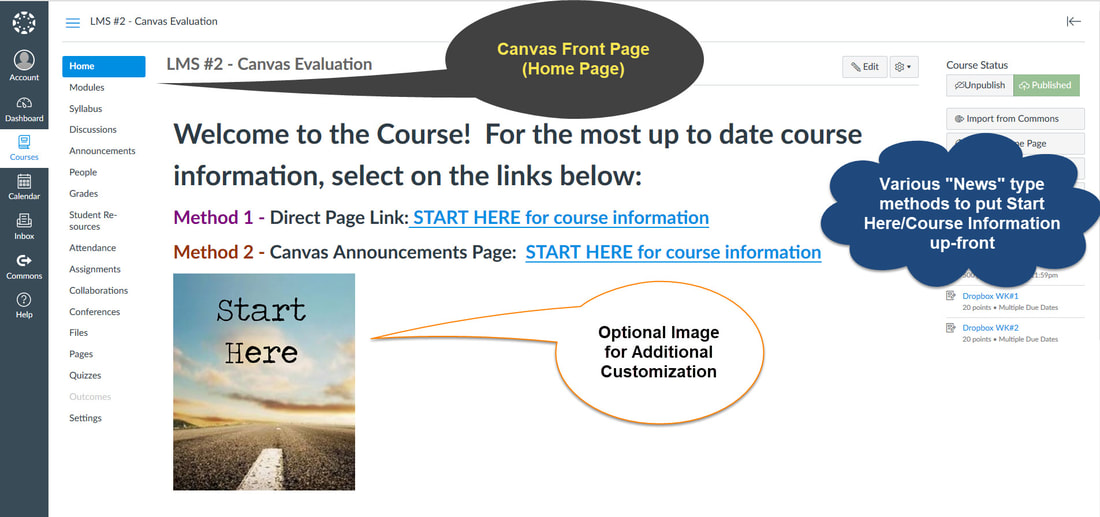
As stated, Canvas does not offer widget tools as a method of short cutting to course content, but instead used direct web links. Start Here information could be added to the News link since Canvas provides the option to notify users when content has changed. However, it is more efficient to directly add Start Here information as a link on the course Front Page. This allows for direct linking to the Start Here/Getting Started HTML page (Image – Method 1).
Another method is to link an Announcements Page to the Front Page. This also allows a direct link to the Getting Started Page, plus specific and personalized announcement information. Announcements can be set to notify participants of new information, and facilitates participant replies (Image – Method 2).
To add either method, select Edit on the top right of the course Home Page, then select Insert (either method) in the HTML editor. Incorporate cascading text style, embed images, add links, etc., for further customization.

4. Customizing the NAVBAR (Navigational Tool Ribbon)
To customize the left tool ribbon in Canvas (similar to the NAVBAR in Brightspace), select Settings. On the top tool ribbon within settings, select Navigation.
This page gives users the option to hide or enable course navigation features by selecting the drop-down to the right of each navigation option. Users can also re-arrange tool order as needed. Select the blue Save button at the bottom of the Navigation page when finished.

5. Posting an Audio Message in the News Tool
Canvas uses the same Adobe Flash audio/video embed tool as Brightspace. To add an audio welcome message to the home page, select Home on the left tool ribbon, then Edit on the top right of the Home page.
Select Edit to open the HTML editor. Once open, select a location on the home page you want the audio recording icon to appear, then select the Record/Upload Media button on the bottom center of the HTML toolbar. Provide a title for the audio welcome, then select Record to begin the audio recording. When finished, select the blue Save button on the bottom right of the Home page HTML edit view.
LMS Weekly Recommendation
This week’s evaluation involved basic steps to enhance the LMS homepage for visual or aesthetic appeal and ease of navigation to provide course participants with good first impression of the course home page and associated content.
Both Brightspace and Canvas offered similar features and methods of improving Home page image. The primary difference between the systems is Brightspace uses Widgets, or fixed content applications to feature course content, while Canvas uses links located in modules tied to HTML pages and other various course content. As with previous evaluations, Brightspace modifications require multiple drop-down, page, and link navigation steps, while Canvas accomplished the same or similar tasks in simpler fashion with less clicks. Canvas also provides more initiative customization of course pages including custom image embedding of the Home and other pages.
Accomplishing Brightspace evaluation tasks required significant navigation and time to follow task instructions. The same tasks were executed in Canvas with no need to reference instructions. Canvas wins this week’s evaluation based on intuitive execution, better aesthetics, and less steps required to accomplish similar tasks.
Week #5 Recommendation: