
Learning Management System (LMS) Evaluation - Week #3
LMS Evaluation - Week #3 Introduction
Welcome to the Learning Management System (LMS) Weebly Web Page Week #3 Assessment in LMS #1 - Brightspace (formally Desire to Learn, or D2L), and LMS #2 – Canvas. Learning Management Systems are software applications for the administration, documentation, reporting, tracking, and delivery of training programs and educational courses.
This week’s evaluation method shifts slightly from step-by-step instruction provided in the previous two weeks, to a more narrative description based assessment of each function and evaluation of capabilities.
Week #3 LMS Features and Capabilities Evaluation
Week 3’s evaluation reviews tools and methods of each LMS involving assessment of student work. The five interactive features of each LMS reviewed this week are:
1. Changing Gradebook Settings. Creating Electronic Gradebook Categories and Items
2. Creating Dropbox Assignments, Turnitin.com, and Grading Rubric
3. Creating Quiz Questions in Question Library
4. Creating Electronic Grades for Quizzes, Creating a Quiz, Modifying Quiz Settings, and Randomizing the Quiz Question Set
5. Conducting a Quality Check (demo student drop-off assignment/instructor grade demo student assignment)


1. Changing Gradebook Settings. Creating Electronic Gradebook Categories and Items
Brightspace allows a number of custom gradebook settings. For this example, personalize the gradebook in the following manner:
Personal Display Options: In the Brightspace shell, select Grades in the top tool ribbon. Then select Settings on the top right. Once in settings, select Personal Display Options. Select all options under Grade Details, which includes Points Grade, Grade Scheme Symbol, and Grade Scheme Color. Next, select both options under Repeat Final Grades. Under Start Page, select Manage Grades to serve as the default when selecting Grades in the top tool ribbon.
While still in Personal Display Options, select the Calculation Options tab on the top right.In this tab, select the Points radio button for the grading system, Calculated Final Grade radio button under Final Grade Released, and Drop Ungraded Items radio button under Grade Calculations. Finally, select Automatically Keep Final Grades Updated under the Auto Update section.Select Save to save calculation options.
Individual Grade Categories: Once personalized settings are complete, create specific grouping categories. This step was performed in the previous week using weeks of a semester for categories.
Individually Graded Items: Next, create individual graded items. For this example, a quiz and Dropbox assignment is crated for each week. To create an item, select Grades in the top tool ribbon, then select the arrow on the New button. Select Item, name the item (e.g., Week #1 Quiz; Week #1 Dropbox, etc.). Repeat this step and name the assignments according for each desired category.
View this YouTube video for detailed information about how to personalize gradebook settings and create electronic gradebook categories and items:

2. Creating Dropbox Assignments, Turnitin.com, and Rubric
Now that there is a category item for Dropbox in Grades, create the actual assignment, give it a point value, and activate the anti-plagiarism tool to discourage student cheating.To create the assignment, select Assessment in the top tool ribbon, then select Dropbox.This takes you to the Dropbox Folders page.Next, select New Folder on the top right of the page and give the Dropbox assignment a name.Associate the assignment with a category for grading purposes.Give it a point value (20 for this example), and allow students to view originality reports by selecting this option under Advanced Options, “Allow Submitter to See Originality Reports". Select Save and Close.The assignment is now associated with a category subject to Originality Checking using Turnitin.com plagiarism detection.
Now that there is a category item for Dropbox in Grades, create the actual assignment, give it a point value, and activate the anti-plagiarism tool to discourage student cheating.To create the assignment, select Assessment in the top tool ribbon, then select Dropbox.This takes you to the Dropbox Folders page.Next, select New Folder on the top right of the page and give the Dropbox assignment a name.Associate the assignment with a category for grading purposes.Give it a point value (20 for this example), and allow students to view originality reports by selecting this option under Advanced Options, “Allow Submitter to See Originality Reports". Select Save and Close.The assignment is now associated with a category subject to Originality Checking using Turnitin.com plagiarism detection.

Creating a Grading Rubric
To create a grading rubric in Brightspace, select Course Admin/Tools, and ensure Rubrics is turned on as indicated by a green check next to “Rubrics”. Next, select the down arrow next to Assessment, then select Rubrics.Select New Rubric, give it a name, then build.Name the criterion, provide descriptions, and point values.When finished, associate the rubric to a graded item by selecting Grades in the tool ribbon, then select the hyperlink associated with an individually graded item.Under rubrics in the graded item, select Add Rubric.When the rubric appears on the graded item screen, select Save and Close.
To create a grading rubric in Brightspace, select Course Admin/Tools, and ensure Rubrics is turned on as indicated by a green check next to “Rubrics”. Next, select the down arrow next to Assessment, then select Rubrics.Select New Rubric, give it a name, then build.Name the criterion, provide descriptions, and point values.When finished, associate the rubric to a graded item by selecting Grades in the tool ribbon, then select the hyperlink associated with an individually graded item.Under rubrics in the graded item, select Add Rubric.When the rubric appears on the graded item screen, select Save and Close.
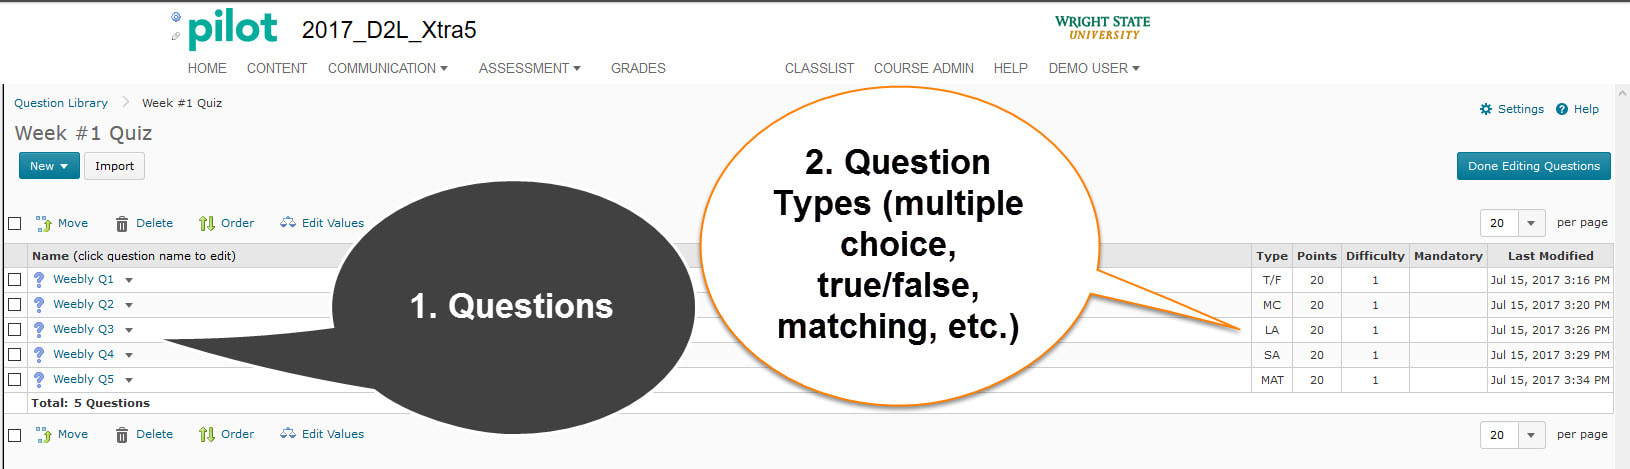
3. Creating Quiz Questions in Question Library
Creating Brightspace quiz questions in the question library is extremely straightforward and intuitive. Begin by selecting Assessment in the top tool ribbon, then select Quizzes and Exams. Next, select Question Library to the right of Manage Quizzes. Once in the Question Library, select the down arrow on the New button, then select Section. Give it a section name, then select the named hyperlink. You are now inside the quiz. Select the New button to view a number of quiz question types. Create as many questions and types of questions as needed, assign a point value to each question, and a number of other options. Brightspace makes it easy to create multiple types of quiz questions. The ability to preview the question before publishing it is a nice touch. The image above illustrates five types of quiz questions (multiple choice, true/false, short answer, long answer, and matching).
Creating Brightspace quiz questions in the question library is extremely straightforward and intuitive. Begin by selecting Assessment in the top tool ribbon, then select Quizzes and Exams. Next, select Question Library to the right of Manage Quizzes. Once in the Question Library, select the down arrow on the New button, then select Section. Give it a section name, then select the named hyperlink. You are now inside the quiz. Select the New button to view a number of quiz question types. Create as many questions and types of questions as needed, assign a point value to each question, and a number of other options. Brightspace makes it easy to create multiple types of quiz questions. The ability to preview the question before publishing it is a nice touch. The image above illustrates five types of quiz questions (multiple choice, true/false, short answer, long answer, and matching).
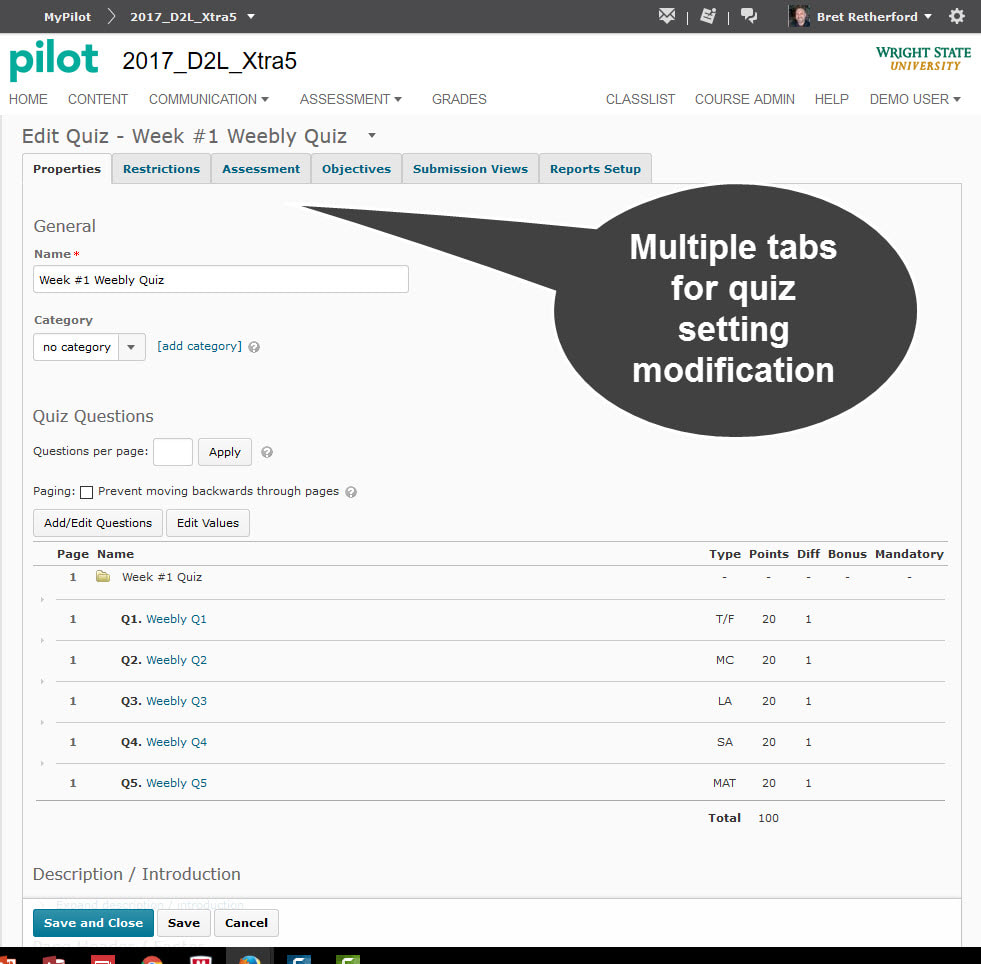
4. Creating Electronic Grades for Quizzes, Creating a Quiz, Modifying Quiz Settings, and Randomizing the Quiz Question Set
This step is required to create a quiz (specifically, using questions from the Quiz Library), and link the quiz item grade in the gradebook with the quiz itself.
To create a quiz, select Assessment and then Quizzes and Exams in the top tool ribbon. Select New Quiz. Modify settings in the six Edit Quiz tabs as needed. If using questions from the question library, it is important that Add/Edit Quiz Questions is selected to use existing questions from the Quiz Library. Also, it is important to associate the quiz with a Grade Item in the Assessment Tab, and automatically export to grades.

5. Conducting a Quality Check (demo student drop-off assignment/instructor grade demo student assignment)
To ensure assigned work appears in the course and can be graded, it’s important to emulate a fake student to make sure assignments and requirements work properly. To test this, sign in as a Demo Student by selecting Classlist. In the Classlist screen, select the down arrow next to the demo student and choose Impersonate. In this mode, submit a written assignment in Dropbox, and take the quiz created earlier.
To ensure assigned work appears in the course and can be graded, it’s important to emulate a fake student to make sure assignments and requirements work properly. To test this, sign in as a Demo Student by selecting Classlist. In the Classlist screen, select the down arrow next to the demo student and choose Impersonate. In this mode, submit a written assignment in Dropbox, and take the quiz created earlier.

Next, exit Demo Student mode and grade both assignments as an instructor. This is important to ensure the gradebook links to the actual assignment, adjust grades that were subject in nature (e.g., a narrative answer), and ensure the plagiarism checker worked properly.

1. Changing Gradebook Settings. Creating Electronic Gradebook Categories and Items
Canvas personal gradebook display options vary significantly from Brightspace with seemly less options, but ultimately requiring less navigation than Brightspace with similar results. Canvas combines both student and individual grades in aggregate in the grades section of the left tool ribbon on the Home page.
Personal Display Options: To view a combination of both assignments and student grades, select Grades located on the left tool ribbon while on the home screen. This view provides an overview of both student and individual assignment grades. Selecting an assignment allows for some customization of the assignment itself. The most customization is accessed by selecting Individual View on the top right of the Grades screen. In this view, you can rack individual student and class progress, input and distribute grades for students, display grades as points, percentages, complete or incomplete, pass or fail, GPA scale, and letter grades.
Individually Graded Items: Individually graded items are created in the modules, similar to the individual weekly categories in Brightspace. Each item in Canvas can be also be customized for grading. Canvas does not have Dropbox per say, but the same result can be achieved by creating “Assignments” which can be given any naming convention (even “Dropbox”). To create an item which students submit work, select Modules on the left tool ribbon of the home screen. Since the modules are already named for each week of the course, select the “+” button on a given week. A pop-up window named “Add Item to Week #X” appears. Select the Add drop down to add an assignment, quiz, file, content page, etc. Select Assignment and give it a name (e.g., “Dropbox WK#X). This allows submission of assignments in various formats. Once created, select the assignment in the module. This will open the assignment edit page. When edit is selected, you can add points, an assignment group, grade display options (in this case, points), Submission Type (no submission, online, paper, or external tool). Other features such as making it a group assignment, requiring peer reviews, and the ability to assign the work to a specific person, group, or the entire class. Due and availability date options are also available. Creating quizzes or other gradable assignments within a Module is performed in the exact same manner.
View this YouTube video for detailed information about how to personalize gradebook settings and create electronic gradebook categories and items:

2. Creating Dropbox Assignments, Turnitin.com, and Grading Rubric
Unlike Brightspace, creating a Dropbox “like” assignment was covered in Creating an Individually Graded Item (Part 1, above) because Canvas combines assignment creation with grade association, so it is not necessary to separately associate the two functions. In the previous example, Submission Type in the Canvas Assignments create and edit page were created as Online submissions.
Turnitin.com is not provided as a service, but can be added as a third-party association. If available in the assignment creation page, activate the associated plagiarism checker by changing the assignment submission type to External Tool, then select a linked plagiarism tool such as Turnitin.com if available.

Creating a Grading Rubric
A rubric can be added to an assignment by selecting an assignment in the Assignments section on the left tool ribbon. Select an assignment, then select +Rubric on the assignment page. You can create a rubric on the fly for each assignment, transfer a rubric from another assignment, or upload a rubric.
A rubric can be added to an assignment by selecting an assignment in the Assignments section on the left tool ribbon. Select an assignment, then select +Rubric on the assignment page. You can create a rubric on the fly for each assignment, transfer a rubric from another assignment, or upload a rubric.
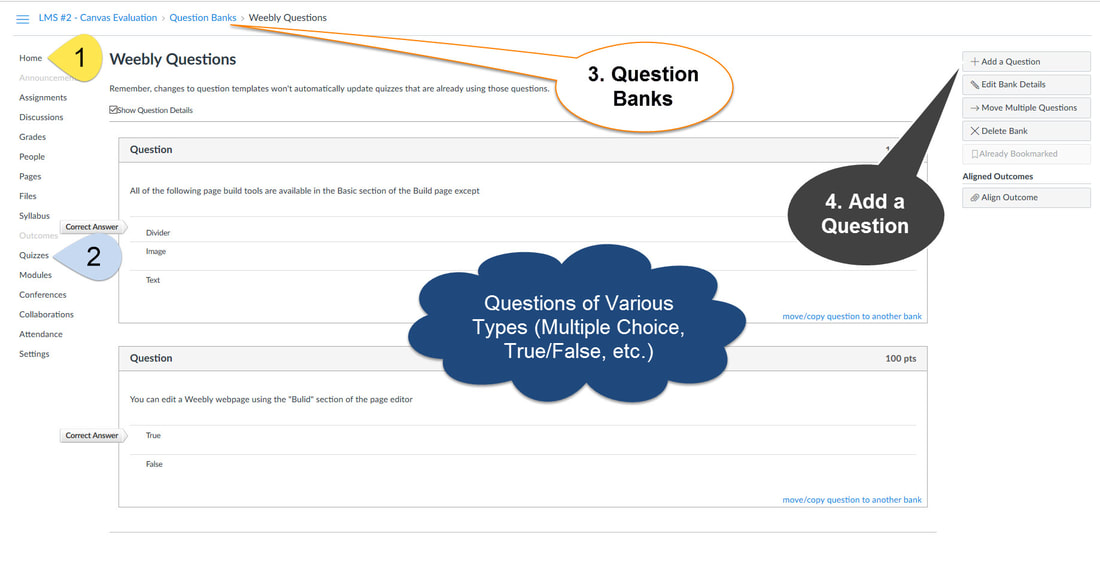
3. Creating Quiz Questions in Question Library (Canvas Question Bank)
Question libraries in Canvas are referred to as Question Banks and serve the same purpose. Top create a question bank, select Quizzes in the course Home page tool ribbon. In the quiz page, select the gear button on the top right of the screen and select Manage Question Banks. Once on the Course Question Banks screen, select +Add Question Bank. In this screen, name the question bank and select Enter on your keyboard. Once created, the question bank becomes a hyperlink ready to create questions. Select the link. On the right of the screen, select the +Add a Question button. Canvas offers 12 different question formats.
Question libraries in Canvas are referred to as Question Banks and serve the same purpose. Top create a question bank, select Quizzes in the course Home page tool ribbon. In the quiz page, select the gear button on the top right of the screen and select Manage Question Banks. Once on the Course Question Banks screen, select +Add Question Bank. In this screen, name the question bank and select Enter on your keyboard. Once created, the question bank becomes a hyperlink ready to create questions. Select the link. On the right of the screen, select the +Add a Question button. Canvas offers 12 different question formats.

4. Creating E-Grades for Quizzes, Creating a Quiz, Modifying Quiz Settings, and Randomizing the Quiz Question Set
Creating quizzes and grades for quizzes is accomplished simultaneously. Once published, the quiz appears in the Grades section of the gradebook along with student names. The quiz is also hyperlinked back to the quiz page itself for easy editing.
When a quiz is created, the user has the option to create questions on the fly, or use pre-written questions from the question bank. Once the questions are created or imported from the bank, the quiz can be modified in the Details section of the quiz. Setting options similar to Brightspace include type of quiz, shuffle (random) answers, time limit, multiple attempts, assignment criteria including due date and availability.
5. Conducting a Quality Check (demo student drop-off assignment/instructor grade demo student assignment)

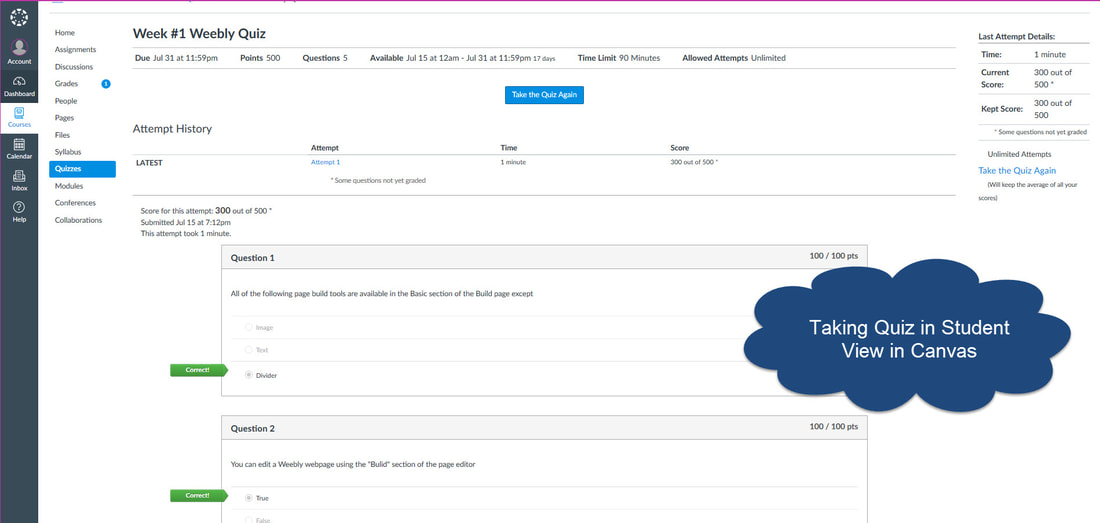
To appear as a Test Student in Canvas, select Settings in the left tool ribbon, then select Student View in the top right tool ribbon. Complete newly created assignments (Quiz, Dropbox), then sign out as Test Student. Navigate to the Grades section of the course located in the left tool ribbon. Select Grades, then grade or updated graded assignments. Add comments as appropriate.

LMS Weekly Recommendation
To assist with the weekly recommendation, I write a one sentence Pro or Con (or both) after evaluation each LMS section. To prevent reader bias, I omit these summary assessments off of the section reviews occasionally hinting to a preference within the writing itself. This week was a detailed assessment that required a significant number of steps to achieve similar results for both learning management systems. There were a few functional features I really liked with Brightspace – specifically in Gradebook settings where a previously named item appears automatically to prevent the instructor from forgetting what they were going to name the item to avoid duplicated naming conventions. I also liked how the order of graded items were easily re-arranged. Both Brightspace and Canvas made it simple to create multiple types of questions for quizzing. I really liked the ability to preview the question before publishing in Brightspace.
Although these represent a few standout features for Brightspace, completing each of the five tasks took significantly more steps and screen jumps to achieve the same results as Canvas. This built-in efficiency, clean design, and overall intuitiveness makes Canvas the recommended choice for Week #3.
Week #3 Recommendation:
